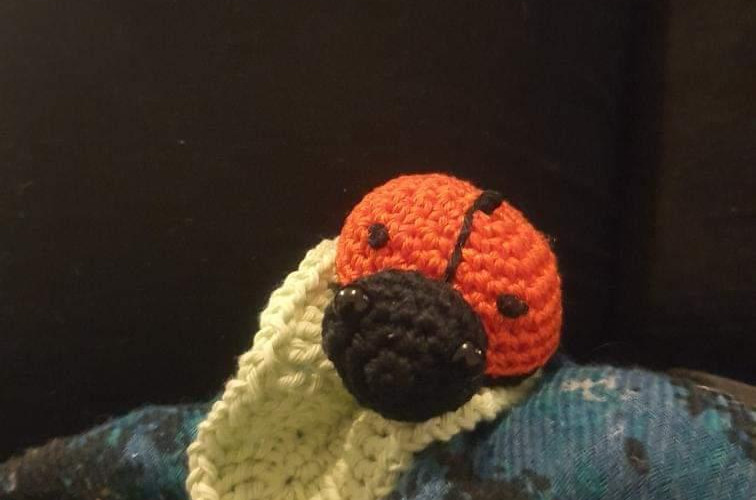
Luna the Ladybird
- Luna Ladybird
- Feb 27, 2024
- 3 min read
Updated: May 8, 2024
Must be springtime, flowers and insects are waking up. What a better time to make yourself a cute little ladybird/ladybug following this free pattern. She comes with her very own leaf too. Cute, right?!

Luna the Ladybird
Level of difficulty: Confident beginner*
Crochet language: US Crochet terms
Gauge/tension: Gauge/tension is not important for amigurumi as long as your stitches are tight and without gaps.
The finished ladybird is approximately 7 cm and the leaf approximately 10 cm.
You will need:
3 mm crochet hook
Yarn needle
Scissors
Small amount of toy stuffing
6 safety eyes (8 mm)
DK (size 3) yarn: black, red and green; approximately 10 g each colour.
*This pattern requires basic knowledge of the following crochet stitches:
Single crochet, half double crochet, double crochet, treble crochet and double treble crochet
Sc into back loops only
How to crochet in continuous circle
Abbreviations:
st(s): stitch(es)
R: Round
beg: beginning
ch: chain
sc: single crochet
hdc: half double crochet
dc: double crochet
tr: treble crochet
dtr: double treble crochet
inc: increase, sc two stitches into one
dec: decrease, sc two stitches together
BLO: crochet into back loops only
[ ] repeat instructions from [ to ]
Note: You will be working in a continuous circle.
Body:
Start by creating a magic circle with red.
Tip: Mark your first stitch with a stitch marker.
R 1: 6 sc into the mc (6 sts).
R 2: inc into each stitch around (12 sts).
R 3: [sc, inc] 6 times (18 sts).
R 4: [sc, inc, sc]6 times (24 sts).
R 5: [sc 3, inc] 6 times (30 sts).
R 6 - 7 (2 rounds): sc into each stitch around (30 sts).
Next round will create a hole to where the head will be attached later.
R 8: sc 13, ch 4, skip 4, sc 13, change to black yarn (30 sts).
R9: BLOsc 13, sc 4 into the chain stitches, BLOsc 13 (30 sts).
R10: [sc 3, dec] 6 times (24 sts).
Add four safety eyes between rounds 4 and 5, equal distance apart, using the head hole as a guide to where the centre is.
R11: [sc 2, dec] 6 times (18 sts).
R12: [sc, dec] 6 times (12 sts).
R 13: dec around (6 sts).
Fasten off and cut the yarn, leaving a long tail.
Stuff the body through the hole left for the head.
Using the black yarn tail, sew in the small hole at the bottom of the body and carry on to embroider the midline onto the ladybird’s back between the spots.
If you would like a pdf with step by step photos, you can get it free from my shop.
Head:
Start by creating a magic circle with black.
Tip: Mark your first stitch with a stitch marker.
R 1: 6 sc into the mc (6 sts).
R 2: inc into each stitch around (12 sts).
R 3: [sc, inc] 6 times (18 sts).
R 4 - 5: sc into each stitch around (18 sts).
Add the safety eyes between rounds 3 and 4 four stitches apart.
R 6: [sc, dec] 6 times (12 sts).
R 7: [sc, dec] 4 times (8 sts).
Fasten off, leaving a long tail for sewing. Stuff the head and sew it to the body matching the 8 stitches from the head to the 8 stitches left on the body to sew two parts together.

Leaf:
Start by creating a slip knot and chain 16, you will now be working into the both sides of your foundation chain, turning your work as you crochet.
R 1: work from the second chain from the hook:
sc 2, hdc 3, 2dc into the next five chains, hdc 3, sc 1, you should have 19 sts and one chain left to work into.
Make 3 sc stitches into the last chain, then start working back into the opposite side of the chain:
sc 1, hdc 3, 2dc into next five stitches, hdc 3, sc 2. Ch 1.
R 2: sc, hdc, dc, tr 17, into the final stitch on this side make 2tr, dtr (mark this stitch to make it easier to find for the next round), 2tr, then carry on working to the opposite side of the leaf:
tr 17, dc, hdc, sc, slst to beg ch-1 to finish.
R 3: [ch 1, slst] 22 times, ch 2, slst into the same stitch (dtr from R2), then [ch 1, slst] 22 times on the opposite side of the leaf.
Fasten off, leave a long tail for sewing the ladybird to the leaf.
Happy crocheting!


Comments